Tuesday, February 12, 2013

Lemon Blueberry Yogurt Loaf

          I really think you are going to love this new recipe. I have been on a bread kick lately, and this is one of many loaves that I have tried. I think you could even consider it healthy since it is made with yogurt. The yogurt actually leaves it very moist and gives it a great hint of vanilla.

This picture doesn't even do it justice!
Yumminess---8---The only thing I would do differently would be to NOT use lemon juice from a jar, but rather squeeze your own lemons. I used the jarred juice, and it left a little bit of a bitter taste.
Easiness---9---The bread really couldn’t have been any easier. I had trouble with it, not because of the recipe, but because my oven was acting strange. I have both bake and convection bake on my oven, and I wish I had used convection. The bread took FOREVER to bake, and it was actually still a little bit gooey when I took it out of the oven. I would suggest using convection bake, or at least make sure you watch it bake rather than take the recipe’s word for it on time.
Repeat---10---Definitely! I plan to make it again this week. I even think I could use the yogurt tip from this recipe in other bread and cake recipes. I am excited to give it a try! I also think I might consider making it with yogurt and applesauce instead of vegetable oil. I know the applesauce trick works great in brownies, so I would imagine that it works similarly in all baked goods.
You can find the original recipe here, but of course I found it through Pinterest!

INGREDIENTSLoaf Ingredients
·         1 ½ cups All Purpose Flour + 1 TBS to the side
·         2 tsp. Baking Powder
·         ½ tsp. Kosher Salt (I didn’t have Kosher Salt, so I used ¼ tsp. Sea Salt)
·         1 cup Plain Yogurt (I used Low Fat Vanilla…and I would definitely recommend it!)
·         1 cup Sugar
·         3 large eggs
·         2 tsp. grated lemon zest (about 2 small lemons)
·         ½ tsp. vanilla extract
·         ½ cup vegetable oil
·         1 ½ cups blueberries (frozen or fresh. I used frozen)
Lemon Syrup Ingredients
·         1/3 cup freshly squeezed lemon juice (definitely squeeze your own lemons. Do not use store bought lemon juice)
·         1/3 cup sugar
Lemon Glaze Ingredients
·         1 cup confectioners’ sugar
·         2-3 Tbs. lemon juice (squeeze your own)
DIRECTIONS
·         Preheat the oven to 350 degrees F. Grease bottom and sides of one 9 x 5-inch loaf pans; dust with flour, tapping out excess.
·         In a medium bowl, sift together flour, baking powder and salt; set aside.
·         In a large bowl, whisk together the yogurt, sugar, eggs, lemon zest, vanilla and oil.
·         Slowly whisk the dry ingredients into the wet ingredients.
·         In a separate bowl, mix the blueberries with the remaining tablespoon of flour, and fold them very gently into the batter.
·         Pour the batter into the prepared pan and bake 50 to 55 minutes, or until a toothpick inserted in the center of the loaf comes out clean. Let cool in the pans for 10 minutes before removing loaf to a wire rack on top of a baking sheet.
·         While the loaf is cooling, make the lemon syrup in a small saucepan over medium heat. Stir together the lemon juice and sugar until the sugar is completely dissolved. Once dissolved, continue to cook for 3 more minutes. Remove from the heat; set aside.
·         Use a toothpick to poke holes in the tops and sides of the warm loaf. Brush the top and sides of the loaf with the lemon syrup. Let the syrup soak into the cake and brush again.
·         Let the cake cool completely.
·         To make the lemon glaze, in a small bowl, whisk together the confectioners’ sugar and 2-3 tablespoons of the lemon juice. The mixture should be thick but pourable. Add up to another tablespoon of lemon juice if the mixture is too stiff. Pour the lemon glaze over the top of each loaf and let it drip down the sides. Let the lemon glaze harden, about 15 minutes, before serving.

Tuesday, January 22, 2013

Lemon Zucchini Bread

                I have been on a bread kick lately. This one turned out really good, that is, if you like zucchini and lemon. I love both, so of course I think it tasted like heaven.


Easiness---7---You will want a grater or a food processor with a grater for the zucchini. Also, mine turned out a bit under done, which is ok since I love it gooey, but some people might not like it like that.

Yumminess---7---A bit too lemony. There is a perfect amount of zucchini though.

Repeat---9---I will make this again, but I will probably use less lemon. I also would recommend not using lemon juice from a jar, but rather squeeze your own lemons. The artificial taste just makes it taste too tart, in my opinion.

INGREDIENTS
Bread:
·         2 cups all purpose flour
·         2 tsp. baking powder
·         ½ tsp. salt
·         2 eggs
·         ½ cup canola oil
·         2/3 cup sugar
·         ½ cup buttermilk (I used skim milk, and it actually turned out fine)
·         Juice of 1 lemon (or 2 Tbs. lemon juice)
·         Zest of 1 lemon
·         1 cup grated zucchini (you don’t need to peel the zucchini before grating. I used 1 large zucchini)
Glaze:
·         1 cup powdered sugar
·         Juice of 1 lemon (or 2 Tbs. lemon juice)
DIRECTIONS
Bread:
·         Preheat oven to 350 degrees
·         In a large bowl, mix together the flour, baking powder and salt
·         In a separate bowl, mix together on medium speed the sugar and canola oil
·         Add the eggs 1 at a time until fully incorporated
·         Add the milk, juice of the lemon and the lemon zest. Mix until incorporated. Make sure to scrape down the sides of the bowl periodically.
·         Mix in the zucchini
·         Slowly add the dry ingredients while continuing to mix. Allow to mix on low speed until fully incorporated
·         Pour batter into 9x5” cake pan, greased and floured, and bake at 350 degrees for 45 minutes (mine took about 50, and it was stilly kind of gooey)
·         Cool in pan for 10 minutes, then move to a wire rack
·         While loaf cools, make the glaze
Glaze:
·         In a small bowl, mix together the powdered sugar and lemon juice until sugar is dissolved.
·         Pour over the cooled loaf. Let the glaze set, then serve. ENJOY!

Sunday, January 20, 2013

Cranberry Orange Bread


              I love fancy breads, like poppy seed or zucchini especially. I love eating them, but I have never actually made one myself. As you might have guessed, I perused Pinterest for some inspiration. I knew I wanted something with a little orange flavoring, so I came across this Cranberry Orange Bread. My taste buds started smiling as soon as I saw the picture.

I found the recipe through Pinterest on this blog. I think she did a great job with it, and I loved her little hints and tips throughout the recipe.


Easiness---8---As far as bread goes, I can’t imagine it gets much easier than this. You literally just mix the ingredients together and throw it in the oven. Just be careful to not over bake it, because you don’t want it to be too dry.

Yumminess---9---I would give it a 10, but I wish I had used fresh cranberries. It’s my own fault; I deviated from the original recipe, because I couldn’t find fresh cranberries at my grocery store. I ended up using Craisins, which weren’t terrible, but I bet fresh would have been even more flavorful.

Repeat---10---I plan to make this again very soon! I need to figure out the nutritional information, but I can’t imagine that it is too bad for you. I certainly didn’t feel like I was cheating myself by eating it for breakfast a few times.

INGREDIENTS
1 ½ cups flour, all purpose
1 tsp. baking powder
½ tsp. kosher salt (I used ¼ tsp. iodized salt)
½ cup butter, unsalted at room temperature
¾ cup sugar
1 Tbs. grated orange zest, fresh (I used the zest of 1 medium size orange. I think it could have used a little more)
3 large eggs
½ cup whole milk
1 tsp. vanilla extract
1 cup fresh cranberries (You can also use Craisins) plus 1 tsp. flour to toss cranberries in

Syrup:
4 Tbs. orange juice (bottled, without pulp)
4 Tbs. sugar

Glaze:
½ cup powdered sugar
2 Tbs. orange juice (bottled, without pulp)

DIRECTIONS

·         Preheat oven to 350 degrees, Spray a 9x5 or 10x4 inch loaf pan with cooking spray and flour and set aside
·         In a small bowl, whisk together the flour, baking powder and salt and set aside
·         In a stand mixer, cream the butter, sugar and orange zest until light and fluffy (about 3 minutes)
·         Add eggs one at a time until fully incorporated after each egg. Scrape the sides of the bowl after each egg
·         Add the milk and vanilla, mix until fully incorporated
·         Add the dry ingredients slowly while mixing, mix until fully incorporated
·         Toss the cranberries with 1 tsp. flour and fold into the mixture
·         Pour the batter into the greased and floured pan, and bake for 50-55 minutes at 350 degrees
·         Cool bread in the pan for a few minutes, then transfer to a wire rack to continue cooling
SYRUP DIRECTIONS
·         While bread is baking, make the orange syrup. In a small saucepan heat the sugar and orange juice. Bring to a boil and cook until all the sugar is dissolved and the syrup is slightly thickened. About 2 minutes. Be very careful this will burn if unattended.
·         Using a skewer, poke holes all over the top of the bread. After you poke the holes brush the bread with all the syrup. Make sure you use all of the syrup.
GLAZE DIRECTIONS
·         Allow the bread to cool completely before adding the glaze
·         In a small bowl whisk the powdered sugar and orange juice until it is the right consistency. I added the orange juice 1 Tbs. at a time until I achieved the right consistency.
·         Pour glaze over the top of the bread. I used a small spoon and went back and forth a few times to cover the whole loaf.

I'm Back!!

            I bet you thought I gave up, or disappeared, or ate way too much of this delicious food and couldn’t get off the couch in order to write more blog posts for you. Well, kind of. I know it has been almost two months since the last time I wrote, and I am very sorry for that. I believe I told you that I was working for Target a while back. Between work, trying to see my boyfriend more than once per week, and trying to stay in shape I just got so busy that sitting down to write something sounded terrible. That’s clue #1 that something was wrong. I always enjoy writing, food, and writing about food. Clue #2 came with a little work situation that I will not force you to read (just know that it was bad). Clue #3 was when I totaled my car coming home from said work situation on December 21st. Honestly, when my car went out of control I really thought it was time for the much anticipated apocalypse. I was a little disappointed when, instead, I had to get a new car. I got over that quickly though, because I got a beautiful 2011 Jeep Patriot for quite a good deal.
Long story short, that Clue #3 put a lot of things into perspective, and I realized that I was doing something I hated, and I never planned to be in that type of situation. I quit Target the very next day, and I am so happy now.
 I did a lot of soul searching this past semester off school, and I came to the realization that I have been running from my true dream for a very long time, teaching. Ever since I was little, I would think to myself “When I am a teacher…” or “I am going to do something like that with my class”. I am not entirely sure why I never did it, why I changed my mind to becoming a doctor, and then to a psychiatrist, then to an Occupational Therapist, and finally to communications and advertising. I know I was on the path to do something creative, and I think I have finally found it. I am now pursuing my Masters of Teaching at Missouri Baptist University, and I plan to become a middle school English and Literature teacher. I absolutely cannot wait!
Sorry if my little story has bored you, but I thought you might like to know why I haven’t been writing. Don’t worry though; I didn’t stop cooking! J I have quite a few recipes lined up for your pleasure, so get ready! I am so glad to be back!

Thursday, November 29, 2012

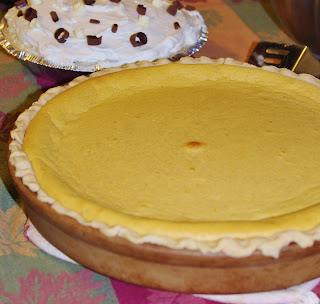
White Chocolate Pumpkin Cheesecake Pie

            Happy late Thanksgiving! I hope everyone had a fantastic holiday and got to spend it with your family and friends.
            I did a whole lot of baking for the holiday, even though I also had to work on Wednesday, Black Friday, Saturday and Sunday (oh, the joys of retail). We celebrated Thanksgiving with my boyfriend’s family and my dad’s side of the family on Thanksgiving and my mom’s side on Sunday. Lucky for you, I made a million pies for the big days, two of which you have already seen on my blog, the White Chocolate Banana Cream and the Creamy Apple Crumb. Now, I have two variations of pumpkin pie to share with you.
            The first is White Chocolate Pumpkin Cheesecake. I have really been on a pumpkin kick this fall, and I am always willing to try a cheesecake. I thought these two married perfectly. I found the original recipe here.

·         Easiness---9---For a cheesecake, this is as easy as it gets (unless you use a box mix, of course).
·         Yumminess---8---It needs more spice in my opinion, but that could just be me.
·         Repeat---10---Next year!!!
INGREDIENTS
·         Make the crust I used in this recipe, bake at the same time as the cheesecake
·         2 (8 oz.) packages of cream cheese
·         1 cup sugar
·         3 eggs, beaten
·         1 tsp vanilla extract
·         5 ounces white chocolate, melted
·         ¾ cup canned pumpkin
·         1 tsp ground cinnamon (could use 2)
·         ¼ tsp ground nutmeg (could use ½)
DIRECTIONS
·         Beat cream cheese and sugar until smooth. Add eggs and vanilla, beat on low until combined
·         Add in pumpkin, spices and melted white chocolate. Beat on low until combined.
·         Pour filling into the crust. Bake at 350 for 50-55 minutes, or until center is set.
·         Cool for at least an hour before serving.

Wednesday, November 14, 2012

White Chocolate Banana Cream Pie

          I think it is safe to say that the best part of Thanksgiving is the pie. Actually, dessert is really the only part that sparks my interest that day, because I am not a big fan of turkey.  I wanted to share this recipe with you ASAP, just in case you want to try it out next Thursday!
          Some of you may have heard of the restaurant The Blue Owl, a restaurant in Kimswick, Missouri that has some of the best recipes that even Oprah had to give them a visit. My mom’s favorite dessert from there is the White Chocolate Banana Cream Pie. I am not much into cream pies; I prefer apple or cherry, but my mom really likes this one. She actually likes it so much that she was contemplating ordering one from the restaurant to serve on Thanksgiving! Um…no. Not acceptable. I will be making the pies. J
          I ended up stopping by the Blue Owl to pick up their cookbook the other day, but I used a different crust than the one in the cookbook because I didn’t have any Crisco. And, I’m sorry, but crusts made with Crisco are never a good idea.
My poor attempt at a slice of the pie. I clearly cut
into it way before it was set... so be careful to let
it set overnight preferably
·         Easiness---5---This is time consuming, and the pudding is difficult to get to the right consistency. However, it is worth the trial and error!
·         Yumminess---9---I should have used more banana and white chocolate, but my family disagrees…so you better stick to the recipe
·         Repeat---10---Yes, I am planning to make it for Thanksgiving!
          Here is my version of the best banana cream pie you will ever try!!!

Adapted from the Blue Owl

INGREDIENTS
Pie Crust—No Rolling Involved
·         3 cups all-purpose flour
·         2 tsp. salt
·         4 TBS sugar
·         2 beaten egg yolks
·         1 cup vegetable oil
·         4 TBS cold milk
 
Pudding Filling
·         ½ cup sugar
·         ¼ tsp. salt
·         ½ cup cornstarch
·         4 cups milk (I used 2% and it was fine)
·         1 TBS butter
·         1 tsp. vanilla
·         4 oz. white chocolate chips (You could use up to about 6-8 oz. if you prefer)
 
Garnish and Assembly
·         2 bananas
·         2 oz. white chocolate melted
·         2 oz. dark chocolate melted
·         1 cup heavy whipping cream
·         ¼ cup (more or less depending on taste)
·         1 tsp. vanilla

DIRECTIONS
·         To make crust, sift flour, salt and sugar in your pie pan (9”). Combine oil and milk in a separate bowl and whip with fork until combined. Pour all at once over the flour mixture. Mix with fork until flour is completely dampened. Press evenly and firmly to line the bottom of pan, then press dough up to line the sides and partly cover the rim. Bake at 425° for 12-15 minutes or until golden brown. TIP: Cover lightly with a sheet of foil to prevent edges from burning.
·         For the pudding, in a saucepan, combine sugar, salt and cornstarch. Stir in milk and cook over medium heat, stirring constantly until mixture begins to thicken (Bring to a light boil, then reduce heat and keep stirring until thick). Pour ½ cup of the hot mixture into beaten egg yolks while stirring to keep eggs from cooking. While stirring milk mixture in saucepan, slowly blend in egg yolk mixture and stir well. Continue cooking until pudding is think and bubbly. Remove pudding from heat and stir in butter, vanilla and white chocolate. Pour into a glass bowl, cover and chill for at least 2 hours.
·         After the pudding chills, thinly slice bananas and fold 1 ½ bananas into the pudding. Pour the pudding into the pie crust. Top the pie crust with the remaining ½ banana.
·         To make the whipped cream, beat heavy whipping cream on high for about 1 minute. Slowly add sugar while beating. Be sure to not add too much sugar, depending on your preference. Add vanilla. Keep beating the mixture until it is firm and fluffy.
·         For the topping, melt white and dark chocolate separately and spread on a flat plate. Chill until it is hard. Scrape off shavings for decoration. I tried to make the curls, but was unable to get it to work. Maybe someone can teach me! J
I melted my chocolate on a plate, but feel free
to do it however you like
·         Top the pudding with the whipped cream and sprinkle with the white and dark chocolate shavings. ENJOY!!!
I think it is the best looking pie!!
 

Monday, November 12, 2012

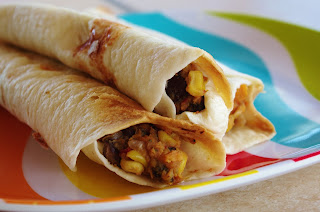
Crispy Veggie Flautas

         My birthday was on October 12th, and to celebrate I went to Food Truck Friday in St. Louis.  It was my third time going to the event, and I absolutely love it. I like to try something different every time I go, so this time I went with LuLu’s LocalEatery Food Truck, and I had a delicious wrap filled with sweet potato, rice, black beans, corn and a yummy avocado sauce. I had been thinking about trying to make something similar to this when I saw this recipe on Pinterest. I couldn’t believe how similar it was, so I knew I had to give it a go.
          It is the perfect amount of spicy, and it is meatless, so it works for an array of different diets.  You could also easily make it lactose free, I believe, by just removing the small amount of cheese.  I hope you enjoy this as much as I do (I’ve already made it a second time so that I could freeze them and take them to work for lunch!).

·         Yumminess---10---These are melt in your mouth good, and are a completely guilt free meal if you are trying to count calories or eat healthy like I am.
·         Easiness---10---Really a pretty simple recipe. The sweet potato cooks easily in the microwave, then you just have to mix everything together and fill your tortillas and bake them!
·         Repeat---10---Already made it again! It worked out great; I made about 30 of them, and then I froze them in packs of 4-5 so I could take them for lunch!
INGREDIENTS
·         1 can Mexicorn
·         1 can Black Beans Original Flavor
·         2 Sweet Potatoes medium size
·         ¼ Cup Diced White Onion
·         ½ tsp Chili Powder
·         ½ tsp Garlic Powder
·         ½ tsp Fresh or Dried Cilantro
·         ½ tsp Cumin
·         ½ tsp Cayenne Pepper
·         3 oz. Cream Cheese (I used fat free and that worked just fine)
·         ¼ cup grated cheese (I like something spicy like pepper jack)
·         About 20-30 small size tortillas (6-8 inches)
·         Spray Pam

DIRECTIONS
·         Microwave your sweet potatoes for 8 minutes. Use a fork to poke a few holes in the potato, and wrap in a damp paper towel to keep the moisture in them.
·         De-skin the potatoes and mix with the cream cheese with a spoon until it is a nice creamy texture.
·         Mix in the rest of the ingredients.
·         Spray a cookie sheet with Pam and preheat your oven to 400°
·         Fill your tortillas with about 2 TBS worth of the filling and roll into a flauta.
·         Spray the flautas with Pam and bake for about 10 minutes or until golden brown and crispy.
 

If you have any questions about this recipe or any other, please feel free to comment or ask!